Lightroom Classic 9.3
New
Language Support
With
Lightroom Classic 9.3, Adobe has added support for Thai and Russian languages.
New Tether Support
This
release brings support for the Canon EOS-1D X mark III
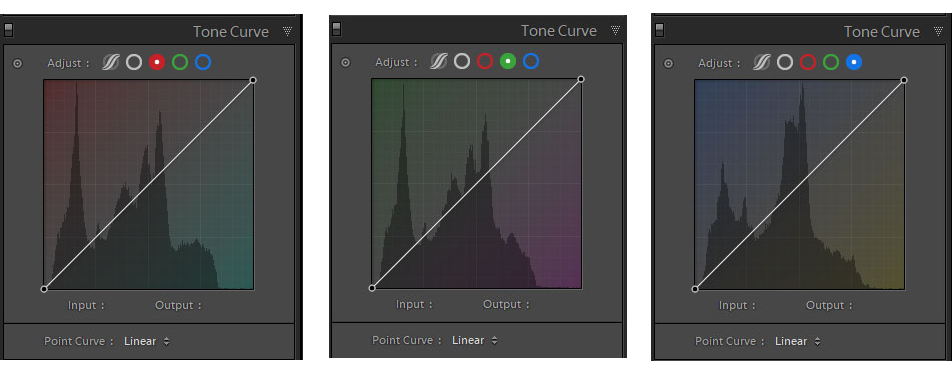
Tone Curve
In
this release, Adobe has refreshed the user interface for the Tone Curve with
simple buttons to choose the parametric (beginners) curve or point curve
(advanced users). Previously these needed to be selected from a pull-down menu.
The
right-click context menu (control + click on MacOS) now offers the following
options:
-Reset Channel
-Reset All Channels
-Copy Channel Settings
-Paste Channel Settings
-Snap to Grid
-Show All Curves
For point curves, the axis
values are now shown instead of percentages. Adobe has added the ability to pin
a control point and adjust its value using the input/output textbox.
I do like the new UI, notably the individual RGB color channels
where the point curve background is subtly shaded representing opposite sides
of the color wheel. This makes it more intuitive when dragging individual
points e.g.
Red – Cyan
Green – Magenta
Blue – Yellow
The UI for the parametric curve has received a similar update and
the context menu provides for resetting regions, splits or resetting all.
This You Tube Video from Paul Charlton is a good example
of using the Tone Curve color channels.
HSL/Color
The UI for the Color
section of the HSL/Color panel has also been refreshed with the addition of
individual color switch buttons plus a button for all colors.
Raw Defaults - Presets
With this release Adobe has provided a new set of “Defaults” in
the presets panel.
These will help as quick shortcuts to preview and apply different
default settings or to use as import presets. They will also be helpful to
those not familiar with creating XMP files. They cover a range of profiles,
lens corrections and iso interpolation.
ISO
Adaptive Presets
Optionally, when creating your own user presets it is now possible
to make them iso adaptive.
-Select two or more images, with different ISO values.
-Edit each image according to your liking and using
different Luminance Noise Reduction values appropriate for the ISO value.
-With the images still being selected, click on
"Create Preset”.
-Along with selecting the various settings for the preset,
make sure to select "Create ISO adaptive preset" option in “ISO
Settings” section at the bottom of the preset creation dialog.
-Click on "Create" to create an ISO dependent
preset.
The above steps are also applicable to "Update with
Current Settings" workflow for updating an ISO adaptive preset. If two or
more images, with different ISO values, are not selected, "Create ISO
adaptive preset" checkbox will be disabled.
Develop
– New Local Adjustment
With this release, Adobe has added a “Hue” slider in Local
Adjustments. This can be used with the selection tools to change the hue of a
selected area in relation to the underlying color. The “Use Fine Adjustment”
option enables a slower progression through the hue changes. Users may find
this new feature also works well in conjunction with range masking.
HEVC
Support for Windows 10
With this release, HEVC videos are supported
on Windows 10.
Center
Crop Overlay
A new 2 x 2 overlay has been added for cropping those
images where you want the subject in the middle of the frame. In the Develop or Library module press “R”
to activate the crop tool and tab with the “O” key to cycle through the
overlays.
Sync
Status
Sync now has its own
dedicated icon in the upper right corner. I do like this new prominent position
as many new users often struggled to discover it when hidden under the identity
plate.
We can now easily glance at the current state:
Hovering over the cloud
icon while sync is in progress will show the number of assets currently being
synced.
Clicking on the icon opens
a pop up giving more options including start/pause sync. A link is also
included to a Sync FAQs page for viewing the most common questions.
Multi
Batch Export – Update
With this release,
checking multiple presets in the export dialog would change the “Export” button
to “Batch Export”
A new Batch Export dialog
in Multi-Batch Export workflow then becomes available. The batch Export dialog
gives more control on destination and file naming options for the export
operation.
Parent
Folder - It is now possible specify a Parent folder at the rime of export
which is different to that contained in the selected prests.
If a different parent folder option is selected, then it would
override any Export destination folder defined in selected presets.
With a new destination folder option a new “Put in Subfolder”
option also becomes available when checked.
File
Naming Options - the batch export dialog now permits a change of “Custom Text” and
“Start Number” sequence at this export stage, provided the selected presets
contain such option.
Survey
Mode
Some improvements have been made to the appearance. So borders,
star ratings, picks and color labels will display more clearly when the
background color is changed, notably when using a black or white background.
Other
Changes
In addition to the above, this release
includes the latest camera and lens support together with a number of bug fixes.
It also includes optimizations to grid scrolling and improved collection search
with new architecture, similar to the one used in Folder search.
Some
optimization has been made to improve Edit Slider interaction rendering in
Develop module. This means navigator view, detail thumbnail, and filmstrip
thumbnail would not be updated during scrubbing (dragging a slider without
releasing the mouse) in Develop module. These will get updated as soon as
scrubbing for an edit slider stops and the mouse button is released.
With this release, AVI
files are now supported on macOS.
It is now possible to
view/edit Three Dimensional Projection metadata info in Lightroom Classic where
such information is available.
Lightroom 3.3
Watermarking
Watermarking has been available from Lightroom mobile on
phone or tablet but many customers will be pleased to know that it now becomes
possible from the desktop with Lightroom 3.3
There is a new rich font list, giving a wide choice of
selections of fonts from the pull-down menu which can also be scrolled using
the mouse wheel. Settings will sync to other clients.
A default font will be used if the selected font is not
available on the client that you’re currently exporting from.
I've made a quick YouTube Video which gives an overview of this feature.
Raw
Defaults
Raw defaults, first introduced in Lightroom Classic are
now available in this release. They are set in preferences and applied as a
starting point for your editing. You can
specify Adobe Defaults, Camera Defaults, or a Preset for your raw files to use
on import. Camera defaults read the image metadata, applying the appropriate
profile based on the in-camera profile/style that you set in your camera.
You can use your own user presets if preferred and
additionally Adobe has provided a built-in set of raw default presets which can
be accessed in preferences under:
Presets >>
Defaults
These provide a number of combinations of profile, lens
correction and noise reduction. They can also be accessed by clicking Presets
(botton-right) when the edit panel is open. Hovering over each will show a
preview. The presets containing noise reduction are useful in that they
automatically apply different levels of NR based on iso; so for example an
image shot at iso 200 will receive a much lower level of NR than one shot at iso
8000 etc.
Selective
Adjustment – Local Hue Slider
This new feature enables selective color changes when
using the brush, gradient or radial filter tools.
Checking the fine adjustment box enables the slider to
move more slowly through the range of different hues.
New
Versions Feature
Versions are similar to snapshots in Lightroom Classic
which save the edit settings at a point in time. This means you can save
different “looks” without making duplicate copies. These could be a black &
white version, or color versions with different settings or different aspect
ratios. Each version is like a bookmark which you can return to at any time.
Versions can be accessed from the edit panel
(bottom-right)
After editing a photo click on the plus icon to create a
new version with those settings. A new thumbnail is created in the list of
versions. It’s possible to hover over the version thumbnails to see a preview
in the main window.
Likes and Comments
You can now like and comment on photos
in albums that have been shared with you where the album owner has activated
this.
Discover
In the “Discover” section you can now
follow particular photographers to see all of their editing techniques.
The Discover playback view has been
update, so that playback automatically shows the list of editing steps on the
right. Playback can be paused by clicking on any step and it’s possible to move
up and down by using the arrow keys.
Share
Edits (Beta)
Submit your own Edits to Discover. This is a new feature
which enables collaboration with others and lets you share your own styles and
develop a following. This release is still regarded as work in progress, hence
the beta label and Adobe is looking for your feedback.
Other
Changes
In addition to the above, V. 3.3 includes the latest
camera and lens support together with a number of bug fixes. It also includes optimizations
to selective edits, UI for edit stack and the accuracy of the guided upright
tool.
Updates to the mobile apps, versions 5.3 are also being
rolled out simultaneously. See the Adobe links below.
One thing I’m pleased about on mobile is the ability to
send a photo from Lightroom for iPad to be edited in Photoshop for iPad.
New App Logos to keep in Doc (Mac) or pin to taskbar (Windows)
Cloud Eco System – Lightroom 3.3 & 5.3
Desktop App – Lightroom Classic 9.3